
Overmolding and insert molding are different two molding process. Imagine gripping a screwdriver that slips because its handle’s too slick—or tightening a bolt only to find the plastic around it cracks under pressure. That’s where the showdown between overmolding vs insert molding kicks in, two popular molding processes in the manufacturing ring that can make or break your product. These aren’t just fancy terms; they’re game-changers shaping everything from tool grips to car dashboards. This deep dive unpacks what’s package forming, what’s insert molding, their materials, their quirks, and how to pick the right one. We’re comparing the insert molding vs overmolding difference to help you craft parts that don’t just work—they wow.
What’s Overmolding?
Overmolding is a two-step injection molding process that combines multiple materials into one cohesive part. First, a base material—typically a rigid plastic like ABS or polycarbonate—is injected into a mold and cooled. Then, a second material, often a softer thermoplastic elastomer (TPE) or silicone, is injected over or around it, forming a layered structure. This could mean two separate molds or a single mold with dual injection barrels, depending on the setup. The outcome is a part with distinct properties—like a hard core wrapped in a grippy, flexible shell.

Common Overmolding Materials and Bonding
Materials in overmolding are picky, as the two layers must bond effectively. Common base plastics include ABS (strong, affordable) and polypropylene (PP, lightweight), paired with overmold materials like TPE (flexible, grippy) or TPU (tough, elastic). Such as: Temperatures vary—ABS melts at around 200°C for the first shot, while TPE might inject at 180°C to avoid degrading the base.
Bonding happens in two ways: chemically, when materials share compatible molecular structures (e.g., TPU over PP), or mechanically, using features like ridges or undercuts to lock layers together. This dual-material approach marks a key insert mold vs overmold distinction—overmolding thrives on creating multifunctional surfaces.

What’s Insert Molding?
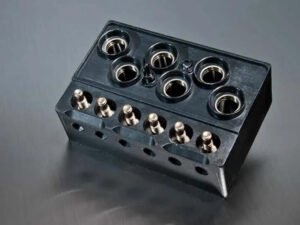
Insert molding, by contrast, is a single-step process that integrates a pre-made component into a plastic part. You place an insert—often metal, like a brass nut or steel pin—into the mold, then inject plastic (say, nylon or PP) around it in one shot. The plastic cools, encasing the insert tightly, and the part pops out ready to go. No second injection, no extra cycles—just a straightforward merge of insert and plastic.
Common Insert Molding Materials
Insert molding splits its materials into two camps: the insert and the plastic.
Inserts are typically metals—brass for threaded fasteners (holding up to 50 MPa), steel for structural heft, or even aluminum for lighter builds. Occasionally, ceramics or pre-molded plastics step in for specialized needs, like high heat resistance (up to 1000°C).
The surrounding plastic? Think PA (nylon) for wear resistance, PP for cost savings, or PBT for electrical insulation. Unlike overmolding’s multi-plastic layering, insert molding pairs a solid insert with a single plastic shot, a hallmark of the overmold vs insert mold contrast.
Overmolding vs. Insert Molding: The Core Differences
The insert mold vs overmold differences distinct approaches in process, complexity, and results. Here is a clear table breaking down the insert molding vs overmolding differences.
When to Use Insert Molding, When to Use Overmolding
Choosing between overmold vs insert mold depends on your project’s DNA. Insert molding shines in low-volume runs or budget-tight scenarios—molds start at $5,000-$15,000, and a single shot keeps costs lean. It’s the pick when you need a metal insert—like a threaded boss in a plastic housing—delivering strength without fuss. Overmolding’s your go-to for high-volume production where tooling costs ($20,000-$50,000) spread out, or when a part needs dual properties—like a soft grip over a hard core. Scale matters: 100 parts scream insert molding; 10,000 lean toward overmolding. Design goals seal the deal—raw utility vs. enhanced user experience.
Overmolding Applications
Overmolding flexes its muscle across industries. A power tool handle, for instance, might pair a PP core with a TPE overlay—rigid where it counts, grippy where you hold it—slashing assembly time by 20% since no glue’s required. In medical devices, syringe grips use silicone over polycarbonate, blending comfort with sterilizability. Car interiors tap overmolding too—think dual-color dashboard knobs that feel premium. The insert molding vs overmolding difference here is clear: overmolding’s about elevating both form and function, often for end-user appeal.

Insert Molding Applications
Insert molding carves its niche with structural grit. Take a car’s plastic bracket with a brass insert—torque it to 100 Nm, and it holds fast, no stripping. Electronics lean hard on it—metal pins molded into nylon connectors cut assembly steps by 30% compared to post-molding insertion. Surgical tools benefit too: a steel blade encased in PBT offers precision and durability in one piece. In the overmold vs insert mold lineup, insert molding’s strength lies in embedding tough components for no-nonsense performance.

Advantages and Disadvantages of Overmolding and Insert Molding
The overmolding vs insert molding choice hinges on trade-offs—each process brings strengths and drawbacks. Here’s a tight breakdown of the insert mold vs overmold pros and cons, keeping it clear and to the point.
Advantages of Overmolding
- Multi-Material Fusion: Bonds rigid ABS with soft TPE, cutting assembly by 20%—no adhesives needed.
- Superior Finish: Smooth, grippy surfaces (0.1 mm texture) boost appeal and comfort.
- Durability: Layers resist peeling (15 MPa shear strength), perfect for high-wear parts.
Disadvantages of Overmolding
- Costly Tooling: Dual molds hit $20k-$50k, tough for small runs under 1,000.
- Slower Cycles: 60-90 seconds per part, 25% longer than insert molding.
- Material Risks: Mismatched melt points (e.g., 20°C off) can delaminate, needing tests.
Advantages of Insert Molding
- Cost Savings: Single molds at $5k-$15k, with 45-second cycles—ideal for 100-500 parts.
- Strength: Metal inserts add 50-150 MPa tensile power, great for load-bearing jobs.
- Efficiency: One-shot process cuts setup by 30%, no material swaps.
Disadvantages of Insert Molding
- Less Flexibility: Limited to insert shapes—no soft layers or textures.
- Precision Demands: 0.1 mm misalignment weakens bonds (20% pull-out loss).
- Adhesion Hurdles: Smooth inserts need roughening or adhesives ($0.50/part extra).
Design Guidelines for Overmolding and Insert Molding
Crafting parts for overmolding vs insert molding isn’t just about following standard injection molding rules—it’s about tweaking the playbook to fit each process’s quirks. Both techniques build on compression or injection molding foundations, so basics like draft angles (1-2°) and uniform wall thickness (2-3 mm) still apply. But the insert mold vs overmold divide demands extra steps to make parts that hold up under heat, pressure, and wear. Here’s how to design smart for each, with practical pointers to dodge common pitfalls.
Overmolding Design Guidelines
Overmolding’s dual-shot nature—layering a second material over a base—adds complexity to the design of gasket. Keep these guidelines in check to nail it:
Thickness Balance: The overmold layer should match or fall below the base part’s thickness—say, both at 2 mm or the overmold at 1.5 mm. Too thick (e.g., 4 mm over a 2 mm base), and it’ll shrink during cooling, pulling away and leaving gaps. A tight fit keeps shrinkage under 1%, avoiding leaks.
Material Melt Temperatures: Pick an overmold material with a melting point at or below the base—TPU at 180°C works over ABS at 200°C, but flip that, and the base softens, ruining the bond.
Bonding Challenges: Most plastics bond chemically (like TPE over PP) if compatible, but silicone’s tricky—it resists sticking to non-silicone polymers. For silicone overmolding, or even dual-durometer LSR (liquid silicone rubber) combos—like 30 Shore A over 50 Shore A—add undercuts. Recessed grooves (0.5-1 mm deep) lock layers mechanically when chemistry fails.
Mold Mechanics: Standard molding hates undercuts—they complicate ejection with sliders or lifters, jacking up costs by 15-20%. In overmolding, the first part stays put for the second shot, so internal undercuts don’t need fancy ejection—ejector pins or a quick manual pull often do. External undercuts, though, still mean extra tooling.
The overmold vs insert mold difference here is stark—overmolding’s juggling two materials and their quirks, demanding precision in heat and fit.
Insert Molding Design Guidelines
Insert molding’s one-shot simplicity—encasing a pre-placed insert—shifts the focus to the insert itself. Here’s how to design parts that stick and perform:
Insert Shape: Skip sharp corners—rounded edges (0.5 mm radius) cut stress points that crack plastic under 50 MPa loads. Knurling’s better—those tiny ridges (0.2-0.5 mm deep) grip plastic like glue, boosting pull-out strength by 10-15%.
Size Matters: Keep inserts smaller than the molded part—say, a 5 mm brass nut in a 10 mm plastic boss. Oversized inserts (e.g., 8 mm in a 6 mm wall) hog heat, slowing cooling and risking sink marks (0.1-0.2 mm deep).
Material Costs: Metal inserts like off-the-shelf fasteners (M4 screws, $0.10 each) beat custom CNC’d bits ($5+ each)—save the bespoke stuff for must-haves. Plastics cool faster than metals (20-30 seconds vs. 45), so factor that into cycle times.
Adhesion Tricks: Smooth metal inserts—like polished steel—need roughening (sandblasting to 0.05 mm texture) or adhesives (epoxy adds 20 MPa bond strength). Textured inserts (knurled or pre-etched) might skip that, though adhesives still help.
Plastic or Rubber Inserts: Low-energy plastics (like PP) resist bonding without corona treatment—think 40 dynes/cm for stickiness. Texturing the plastic part (via a mold with 0.1 mm patterns) helps too, but textured molds tack on $500-$1000 to tooling.
In the insert mold vs overmold lineup, insert molding’s challenge is locking that insert in place—less about material harmony, more about physical fit.
Conclusion
The overmolding vs insert molding comparison isn’t about a winner—it’s about fit. Zhongde supply the scientific molding services. Overmolding layers materials for a premium blend of toughness and touch, ideal for high-volume parts like 10,000 grippy handles, though it’ll stretch your budget and timeline. Insert molding fuses inserts into plastic fast and cheap—perfect for 500 rugged brackets needing metal muscle—yet it skips the multi-material flair. The insert mold vs overmold split is your compass: overmolding for complex, user-focused designs; insert molding for lean, functional builds. Match materials right, design molds tight, and test till it holds—because whether you’re chasing comfort or strength, the part’s got to deliver.


