Guide to Plastic Mold Test: 8 Steps About the Process Setting
Table of Content
We all know that improper mold tool design often causes defects in the final product. Before modifying the mold, try out the mold and evaluate it, optimize the mold tool design and process parameters, which can usually achieve a multiplier effect with half the effort, while meeting the high-quality requirements of mass production for custom plastic parts and rubber parts.
Benefits of Plastic Mold Testing
Mold Design
The plastic mold test is not a procedural step but a strategic in manufacturing success.
First, mold trials guarantee part quality by verifying dimensional accuracy, surface finish, and functional performance against specifications. A well-executed trial mold process catches discrepancies early, preventing defective parts from reaching the market.
Second, identifying issues during the mold trial phase, eliminates the need for costly rework during production.
Third, mold trials optimize the injection molding process. By fine-tuning parameters like injection pressure, temperature, and cooling time, manufacturers achieve shorter cycle times and higher efficiency. Regular mold validation also contributes to extending the injection mold lifespan, reducing long-term costs.
Finally, providing trial samples allows clients to review and approve parts, ensuring alignment with expectations. This collaborative approach, facilitated by trial mold results, builds trust and streamlines project timelines.
Stages of Plastic Mold Testing
Multicavity Injection Mold
The plastic mold test process unfolds through distinct stages, each building on the previous to refine the mold and prepare it for production. These stages, often labeled T0, T1, T2, and occasionally T3 or T4.
T0 (Initial Trial): The T0 stage is the first internal mold trial, focusing on basic mold functionality without producing final parts. It tests mechanical components, such as mold opening, closing, and ejection systems, for structural integrity. This run establishes whether the mold is ready for injection trials.
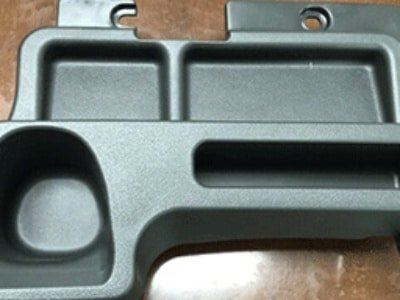
T1 (First Official Trial): The mold undergoes its first official injection molding run, producing initial samples called tooling samples. These parts are assessed for dimensional accuracy, visual defects, and general quality. T1 identifies major issues such as incomplete fill, sink marks, flashing, or warpage, which can be corrected in the mold or molding process.
T2 (Process Refinement): The T2 plastic mold test builds on T1 feedback, aiming for improve production quality. Adjustments to mold design or injection parameters, such as pressure, speed, or cooling, address defects identified in T1. The focus is on achieving dimensional stability, consistent surface finish, and process repeatability. T2 samples are often used for functional testing or pilot runs, bringing the mold closer to production readiness.
T3 and Beyond (If Required): For complex molds or high-precision parts, further trials may be necessary to fine-tune the mold surface finish, address minor issues, or validate longer production runs.
The Eight Basic Steps of a Plastic Mold Test
To ensure completeness and consistency, the Plastic Mold test usually follows this systematic 8-step workflow:
Step 1. Material and Process Preparation
Study material properties (e.g., drying requirements, flow characteristics) and define trial parameters (e.g., injection pressure, temperature). Ensure compatibility with the mold and machine.
Step 2. Mold Inspection
Before installation, the mold undergoes a rigorous inspection, include mold appearance, materials, gating system, cooling channels, and ejection mechanisms.
Step 3. Equipment Setup
Selecting the appropriate injection molding machine based on factors like mold size, shot weight, and material requirements. The machine’s nozzle radius, barrel cleanliness, and auxiliary equipment (e.g., chillers, temperature controllers) are verified to support the plastic mold test.
Setp 4. Mold Installation
The mold is mounted on the machine, precise alignment cooling and ejection systems. Initial tests in manual mode confirm mold actions, such as ejection and reset, function smoothly.
Step 5. Trial Run Execution
The plastic mold test begins with initial injection cycles, producing a small batch (10-20 parts) to evaluate material flow, cooling efficiency, and ejection performance.
Step 6. Part and Assembly Inspection
Measured the produced parts for dimensional accuracy, weight, and surface quality. Assembly fit with other components is tested to identify issues like misalignment or poor tolerances.
Step 7. Process Optimization
Based on trial results, parameters like injection speed, holding pressure, and cooling time are adjusted to eliminate defects.
Step 8. Final Approval and Documentation
The mold is run for 1-2 hours to verify stability under production conditions. Results, including wear-prone areas and maintenance needs, are documented.
Mold and Sample Inspection Checklist
Below is a detailed checklist commonly used during the Plastic Mold test for molds and produced samples.
Mold Inspection Checklist
Sample Inspection Checklist
Is the mold clean?
Is gate position correct?
Is the mold faces free from corrosion?
Are gating filling balanced for multi-cavities mould?
Are mold dimensions correct as designed? Record the actual dimensions.
Are gating filling balanced in one part?
Is material of mold component correct as designed?
Is gating jetting?
Is hardness of mold component correct as designed?
Is part free of flash?
Does ejection system move full stroke at injection and ejection directions?
Is part free of distortion during ejection?
Is the ejection pressure without part OK as customer request?
Is the part free from ejector pin marks?
Is the ejection pressure with part OK as customer request?
Is part free of damage?
Does ejection have noise when moving?
Is there mismatch on part?
Does lifter have anti-rotation?
Is polishing on cavity surface OK?
Mold Design and Test
Zhongde rigorously tests every mold, ensuring precision, reliability, and stable production.
In addition to testing, proper maintenance of plastic molds is equally important to sustain performance and extend service life. Zhongde has a complete quality management system, including but not limited to the above inspection items to ensure the quality of molds and samples.
Common Problems and Solutions in Plastic Mold Testing
Below are common issues encountered during a mold trial, along with practical solutions to resolve them.
Short Shots (Incomplete Filling)
Parts with missing sections indicate poor material flow. This can result from low injection pressure, insufficient speed, or inadequate venting. To resolve, increase injection pressure or speed, enhance venting through additional channels, or redesign the gate for improved flow during the trial mold.
Sink Marks
These depressions occur due to insufficient holding pressure or uneven cooling, causing material shrinkage. Solutions include increasing holding pressure and time, optimizing cooling channel placement, or adjusting mold temperature to ensure uniform cooling in the plastic mold test.
Warpage/Deformation
Uneven cooling or excessive shrinkage can distort parts. Balancing the cooling system, reduce temperature variations across the mold, or select materials with lower shrinkage rates to correct warpage during the mold trial.
Flash (Excess Material)
Excess material along parting lines results from high injection pressure or poor mold alignment. Reducing pressure, improving parting line fit, or increasing clamping force can eliminate flash in the plastic mold test.
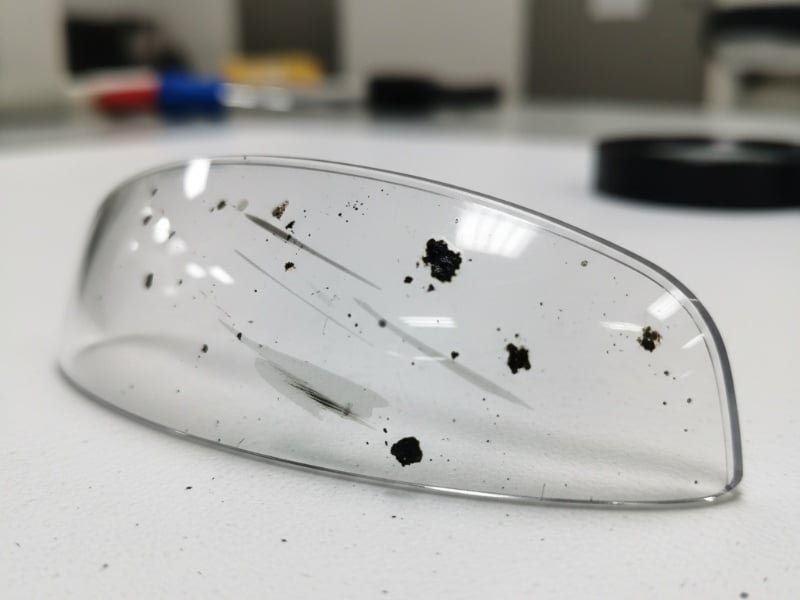
Burn Marks
Localized overheating from trapped air or excessive injection speed causes burn marks. Enhancing venting, lowering injection speed, or reducing melt temperature can prevent burns during the trial mold.
Ejection Issues (Sticking Parts)
Parts that stick in the mold may result from inadequate draft angles or poor ejector pin design. Increasing draft angles, modifying pin placement, or applying release agents can resolve ejection issues in the plastic mold test.
Weld Lines
Weak fusion at material meeting points creates visible lines, often due to low temperature or speed. Increasing melt temperature, adjusting injection speed, or repositioning gates can improve fusion during the mold trial.
Dimensional Inaccuracies
Parts that deviate from specifications may result from shrinkage, improper cooling, or design flaws. Adjusting shrinkage allowances, optimizing cooling, or modifying mold geometry via techniques like EDM ensures accuracy in the plastic mold test.
Streaks
Streaks appear as discolored lines on part surfaces, often caused by inconsistent material flow, moisture in the resin, or contamination. Solutions include thoroughly drying the resin, cleaning the barrel and screw, or adjusting injection speed to ensure uniform flow during the mold trial.
Delamination
This defect manifests as layers peeling apart, typically due to material contamination, excessive shear, or incompatible resin blends. To address, verify material purity, reduce shear stress by lowering injection speed, or ensure compatible resin formulations in the plastic mold test.
Poor Surface Gloss
Dull or uneven surface finish results from low mold temperature, inadequate polishing, or improper material selection. Polishing the mold surface, increasing mold temperature, or selecting a resin with better flow properties can enhance gloss during the trial mold.
Bubbles
Trapped air or moisture in the part creates bubbles, compromising strength and appearance. Solutions include improving venting, pre-drying the resin to remove moisture, or increasing back pressure to reduce trapped gases in the plastic mold test.
Conclusion
By systematically validating mold functionality, optimizing injection parameters, and resolving defects, the plastic mold test ensures parts meet exacting standards. Zhongde provides custom plastic mold services, ensuring tailored tooling solutions for diverse customer needs. Zhongde strictly implements systematic mold testing to ensure high-quality production of customers’ products. Welcome to contact us for your custom injection molding solutions.